PDXpert PLM Software
Application Note
Adding a custom SQL Server report to PDXpert
Last update 2017-04-10
For PDXpert 12.0 and later, see the Report2 version application note.
These instructions apply to PDXpert PLM server software PDXpert release 8.0 through 11.2. PDXpert releases before 8.0 are similar, but use the SQL Server 2005 report definition.
This is an advanced topic. You must be familiar with Microsoft's SQL Server query language, and know how to use Microsoft development tools like Visual Studio and SQL Server Management Studio.
Other reporting options include SQL Server Reporting Services (SSRS) and Microsoft Access, as well as third-party tools like Altova, BusinessObjects, or Domo. If you're familiar with SQL query language, you can export data in a CSV file, as discussed in the Data Transformations collection's SQL transformations topic. Of course, we can also create custom reports for you.
The Report/Export Wizard tool runs a custom report defined by a data transformation. The data transformation contains a SQL Server database query and a modified SQL Server Report. This application note describes how to add the SQL query and report RDLC code to a new data transformation.
Data transformation for SQL/RDLC reports
Within a data transformation <Definition> element, the <dataquery> creates the report data and the <Report> defines its layout. The <Provider> element is a constant that identifies all report transformations.
XML names are case-sensitive. Use elements names exactly as shown.
<Definition>
<dataquery xmlns="http://www.plmx.org/DataQuery.xsd">
...SQL query elements...
</dataquery>
<Report xmlns="http://schemas.microsoft.com/sqlserver/reporting/2008/01/reportdefinition" >
...RDLC report elements...
</Report>
<Provider>f61035e0-a334-4978-909b-b4d4733c7654</Provider>
</Definition>
SQL <dataquery> element
The dataquery element is usually created using SQL Server Management Studio (SSMS). After you develop the report's SQL code in SSMS, copy it into the data transformation's XML.
The dataquery contains three objects:
- The report dataset's SQL query is contained within a CDATA[ ] element. For example: CDATA[SELECT * FROM ItemView].
- The query result name (such as DataSet1) is used during the report development within Visual Studio.
- An optional parameterized="true" attribute indicates that one or more items are selected by the user. Excluding this runs the report against the complete database. For details, see the help file topic Parameterized SQL queries.
<dataquery parameterized="true" xmlns="http://www.plmx.org/DataQuery.xsd">
<choice>
<sql name="DataSet1">
<![CDATA[
...SQL query...
]]>
</sql>
</choice>
</dataquery>
RDLC <Report> element
The Report element is a modified version of the XML .rdlc file created using Visual Studio.
After you develop the report's RDLC code in Visual Studio: (1) copy it into the data transformation's XML, and (2) edit it according to the instructions below.
Do not include the <?xml version="1.0" encoding="utf-8"?> from the RDLC file.
The RDLC <Page> element
Find the <Page> element to define
- the PageHeight and PageWidth to determine page orientation (landscape or portrait);
- the top, bottom, left and right margins; and
- empty PageHeader and PageFooter elements, which are filled by the Report/Export Wizard. These elements are required, but their content is always ignored. Non-empty elements may affect the page layout, so it's better to ensure they're always empty.
A <Page> section, with landscape (wide) orientation, might look like:
<Page>
<PageHeight>8.5in</PageHeight>
<PageWidth>11in</PageWidth>
<PageHeader></PageHeader>
<PageFooter></PageFooter>
<LeftMargin>0.5in</LeftMargin>
<RightMargin>0.5in</RightMargin>
<TopMargin>0.64in</TopMargin>
<BottomMargin>0.64in</BottomMargin>
<Style />
</Page>
The RDLC <DataSources> and <DataSet> elements
The same name is used within the <DataSources> and <DataSet> elements. Assign this name to the query <sql name="{dataset name}"> within the <dataquery> section (above).
Example data transformation: Home Parts List report
This example uses SQL Server Management Studio (SSMS), Visual Studio 2015 Community Edition (VS2015) installed with the Microsoft SQL Server Data Tools (SSDT) option, and the Microsoft Report Viewer 2015 Runtime (RV2015).
Creating the SQL query
In SSMS, develop and validate the SQL query.
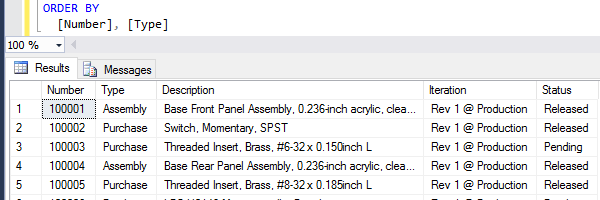
This example SQL query lists all home organization parts' release status, as well as their released or canceled iteration (if none, then it lists the pending iteration).
SELECT
[Number]
,[Type]
,[Description]
,'Rev ' + Coalesce(Revision,PendingRevision) + ' @ ' + Coalesce(Lifecycle,PendingLifecycle) AS [Iteration]
,CASE
WHEN IsCanceled=1 THEN
CASE
WHEN PendingRevID IS NULL THEN 'Canceled'
ELSE 'Canceled+Pending'
END
WHEN PendingRevID IS NULL THEN 'Released'
WHEN RevID IS NULL THEN 'Pending'
ELSE 'Released+Pending'
END AS [Status]
FROM
[viewer].[ItemView]
WHERE
[Class]=1 AND [IsHomeItem]=1
ORDER BY
[Number], [Type]
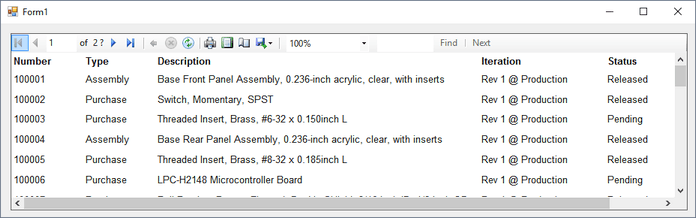
In SQL Server Management Studio, the query result is:
This SQL query is used for
- The RDLC report's DataSet1 and will be saved within the DataSet1.xsd file.
- Your new Data Transformation text file as shown:
<Definition>
<dataquery xmlns="http://www.plmx.org/DataQuery.xsd">
<choice>
<sqlquery>
<sql name="DataSet1"><![CDATA[
SELECT
[Number]
,[Type]
,[Description]
,'Rev ' + Coalesce(Revision,PendingRevision) + ' @ ' + Coalesce(Lifecycle,PendingLifecycle) AS [Iteration]
,CASE
WHEN IsCanceled=1 THEN
CASE
WHEN PendingRevID IS NULL THEN 'Canceled'
ELSE 'Canceled+Pending'
END
WHEN PendingRevID IS NULL THEN 'Released'
WHEN RevID IS NULL THEN 'Pending'
ELSE 'Released+Pending'
END AS [Status]
FROM
[viewer].[ItemView]
WHERE
[Class]=1 AND [IsHomeItem]=1
ORDER BY
[Number], [Type]
]]></sql>
</sqlquery>
</choice>
</dataquery>
<Report>...RDLC report elements will be added here...</Report>
<Provider>f61035e0-a334-4978-909b-b4d4733c7654</Provider>
</Definition>
Since this SQL statement queries the entire database, it doesn't include the parameterized="true" attribute. It's OK if your file's XML whitespace (spaces and tabs) is different, such as how the SQL query is indented.
Creating the RDLC element
Design the report in Visual Studio:
-
Select menu,
-
On the New Project window, select Installed > Visual C# > Windows, and then a Windows Forms Application. Name the project (let's say, PDXpertReportDesign), and click the button.
-
In the Solution Explorer, to the project.
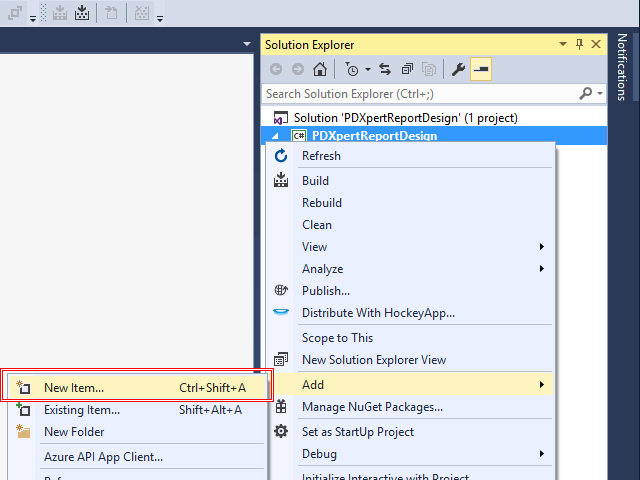
-
On the Add New Item window, select Visual C# Items > Data > DataSet. Name the dataset (say, DataSet1), and click the button. A new DataSet1.xsd document opens.
-
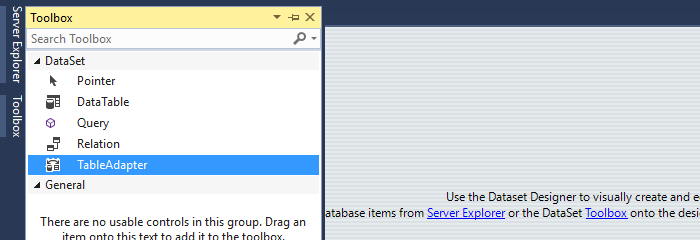
In the Toolbox DataSet tools list, locate the TableAdapter and drag it onto the DataSet1.xsd document.
-
The TableAdapter Configuration Wizard opens. Set up the data connection to the PDXpertDB database. Click .
-
If you wish, save the connection string. Click .
-
Set the TableAdapter database access to Use SQL Statements. Click .
-
Enter your SQL query (above) into the What data should be loaded into the table? textbox. Click . Save the DataSet1.xsd content.
-
In the Solution Explorer, to the project.
-
On the Add New Item window, select Visual C# Items > Reporting, and then either Report or Report Wizard. Name the report (for example, HomePartsList.rdlc), and click the button. A new HomePartsList.rdlc document opens.
-
Add the report's dataset to the RDLC document.
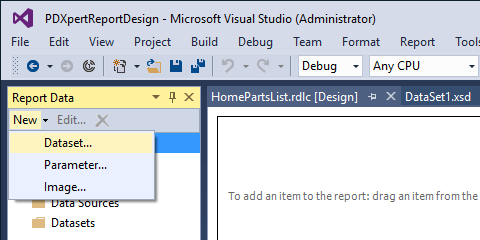
In the Dataset Properties window, select your dataset (DataSet1) from the Data source: dropdown, and click .
-
Designing a report is beyond the scope of this application note. Refer to Microsoft's documentation for details.
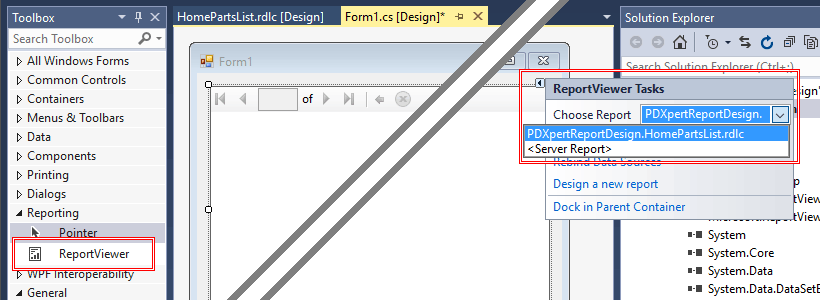
After designing the report, expand the new Form1.cs window to allow the full width of your designed report. From the Toolbox, add and dock a Reporting > ReportViewer control to Form1. In the ReportViewer Tasks control, select your report in the Choose Report dropdown list.
-
Start the project to test your report.
-
In your PDXpert data transformation file, update the <Report> section using the RDLC file created by Visual Studio (in our example, HomePartsList.rdlc).
Do not include the <?xml version="1.0" encoding="utf-8"?> from the RDLC file.
See the Home Parts List data transformation file. You can add this as a new member of the Data Transformations collection.
Final comments
If your report's SQL query refers to any custom attributes, changing a custom attribute name within the Collection Explorer requires a similar update to the related Data Transformation(s).
Microsoft offers many different tools and methods for creating reports. Refer to Microsoft's documentation for more instructions and options.
- Report Designer (Visual Studio)
- Creating Client Report Definition (.rdlc) Files
- SQL Server RDL Specification
For more information on querying the PDXpert database and creating a data transformation, see these PDXpert help topics
- How to report, import & export > View & export via ODBC > View database objects (on line)
- Collections reference > General > Data transformations (on line)
This application note was relevant to the PDXpert software release that was current at time of publication. Product changes since that time may affect its utility. We'd be happy to assist you in assessing the applicability of this note to your situation.
- Designing an engineering change process and workflow
- Server: Fast file content searches using IFilters
- Server: Scheduled backup for the database and library
- Server: Running several PDXpert Application Servers on the same network
- Batch Import: Preparing file attachments for import
- Batch Import: Converting a PDX package for PDXpert
- Batch Import: Keep settings, remove test item records
- Batch Import: Creating release sets for imported data
- Batch Import: Bulk replacing item attributes
- PDX package: Compare all product data, not just the BOM
- PDX package: IPC-2570 package implementation
- PDX package: IPC-2570 security signing and password extensions
- Adding a custom SQL Server report to PDXpert
- Adding a custom SQL Server report to PDXpert 8.0 to 11.2
- Designing email notice templates
- Including labor time and cost in assemblies
- Materials management for regulatory compliance
- Switching an existing item to a different type
- What's the difference between Item Revision State and Item Lifecycle Phase?
- Copying an assembly BOM to another assembly
- PDXpert permissions: User access design
Working within PDXpert
Working with other software applications
- Using Altium Designer EDA software with the PDXpert client
- Using Altium Designer EDA software with the PDXpert server
- Using Cadence OrCAD Capture CIS with the PDXpert client
- Using Cadence OrCAD Capture CIS with the PDXpert server
- Using Pulsonix EDA software with the PDXpert server
- Importing a CAD bill of materials into PDXpert PLM software
- MRP/ERP data transfer options with PDXpert PLM software
- Exporting PDXpert PLM parts, BOM & sources to MRP/ERP
- Importing Trilogy Design Parts&Vendors data into PDXpert
- Exporting a bill of materials from PDXpert to Visio