PDXpert PLM Software
Application Note
Converting a PDX package for batch import
Last update 2023-01-11
Applies to PDXpert PLM software release 12.0 and later. Earlier PDXpert releases are similar but, depending on the import template, column headers may be different.
PDXpert PLM software batch import process
PDXpert includes a batch import tool that allows you to initialize your new PLM system by importing document and part records, and then attaching files to these records.
If you have a PDX package exported by another system, it can be used as the basis for these item records.
However, PDXpert can't directly read PDX packages—the IPC standard assumes the data flow is PLM to MRP, and the PDX file doesn't include configuration data that PDXpert needs.
Using our free PDXplorer tool (download here), you can view a PDX package and export the package data into CSV files that PDXpert can import. The PDXplorer export files include parts and documents, BOMs, AVL sources (organization records + manufacturer parts), and file attachment records. After import into PDXpert, the data can be put under revision control using PDXpert's change workflow.
Setting up PDXplorer§
PDXplorer 5.x / 6.x
PDXplorer 5.0 and later automatically converts a PDX package data to a SQLite database. It includes the SQLite-to-PDXpert export queries, so no setup is needed.
PDXplorer 4.2
Use PDXplorer 4.2 only when you must work on an older system that cannot support .NET 4.7.2 or later – for example, Windows Server 2008 or Windows Vista.
To configure PDXplorer 4.2 for exporting your data:
-
Replace the standard ExportSpecifications.xml file with specifications for exporting CSV files to PDXpert (you'll need Windows administrator permissions):
-
In Windows File Explorer, go to the PDXplorer program folder %ProgramFiles%\PDXplorer Viewer\XML\ (for example, C:\Program Files\PDXplorer Viewer\XML\).
-
Rename the existing standard ExportSpecifications.xml file so you can later identify and restore it: ExportSpecifications-Original.xml
-
Download and save this file: ExportSpecifications-PDX2PDXpert.xml
-
Copy the ExportSpecifications-PDX2PDXpert.xml file into the PDXplorer program folder %ProgramFiles%\PDXplorer Viewer\XML\ and rename it as ExportSpecifications.xml
-
Exporting PDX data to CSV files§
PDXplorer 5.x / 6.x
For more detail on using PDXplorer, see the PDXplorer help instructions.
To export your data from the PDX package:
-
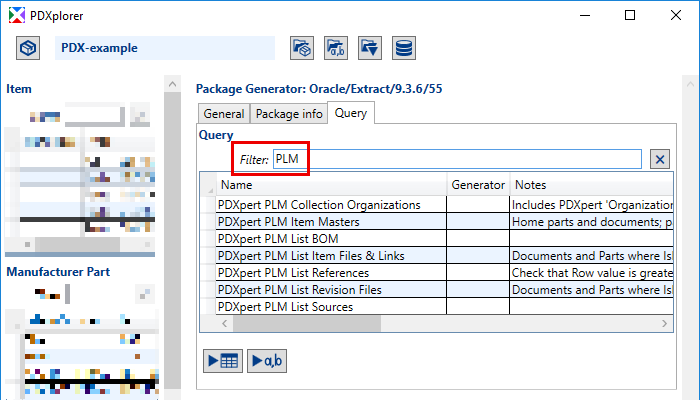
Open the PDX package, and go to the package Queries tab.
-
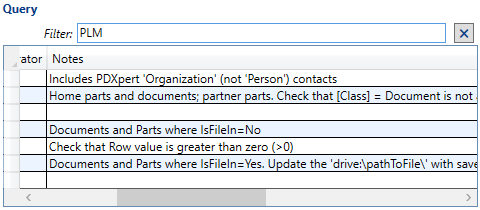
In the Filter: box, enter PLM.
-
The Notes column includes advice about using the query results.
-
Select a query, and click the
 Run query and save results to file button.
 -
Depending on the PDX package generator, you may need to make further changes to the CSV results file before it can be imported into PDXpert.
PDXplorer 5.0 and later extract PDX XML data to a SQLite database. You can directly execute your own database queries to create the CSV files, and automatically add the data needed for import. See below: Reviewing the CSV data before importing to PDXpert
PDXplorer 4.2
For more detail on using PDXplorer, see the PDXplorer 4.2 help instructions.
To export your data from the PDX package:
- Open the PDXplorer software tool.
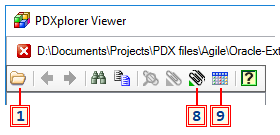
- Open the PDX package (toolbar button 1).
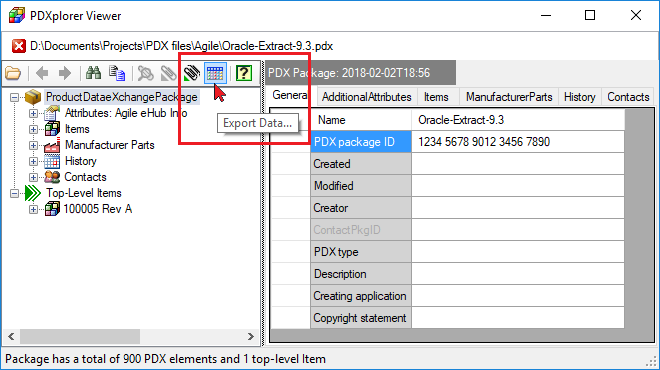
- In the left navigation tree, select the ProductDataeXchangePackage node.
-
Click on the Export Data... toolbar button (toolbar button 9).
-
On the Save As window, open the Save as type: dropdown list. The export templates for PDXpert begin with PDX2PDXpert …
-
Click on the Export Group Files... toolbar button (toolbar button 8).
Reviewing the CSV data before importing to PDXpert §
The IPC-2570 specifiies how to move engineering data to a manufacturing system, not to another PLM system. The PDX file includes a lot of useful data, but should be considered only a starting point for initializing your PDXpert PLM system.
The PDX package generator tool defines the PDX package content. Some package generators include more information than others, which affects what data you'll need to review, add, modify and delete. The generator tool's documentation may describe what the package contains and guide your review of the CSV made by PDXplorer.
The IPC-2570 standard is a flexible framework that is not consistently interpreted by package generator tools. Depending on the source software, export templates may need to be changed, and the exported data will probably need some editing.
- To modify a
-
PDXplorer 5, or later, query result, use the package's SQLite database to modify existing (or write new) SQL queries. See Viewing and saving data query results
- PDXplorer 4 export template, see: Customizing export formats
-
- To review and edit the data that PDXplorer exports, use Unicode-compatible text editors like Notepad++ or specialized CSV editors. Avoid using Microsoft Excel, which can silently reformat numeric and date data, or alter Unicode characters.
Recommendations:
-
Always check the PDX generator tool's version and the package date. The IPC standard allows incompatible export specifications (especially for file attachments), and vendors may change their export specifications over time. Do not assume that PDX packages created at different times or by different PDX generators will share the same format.
-
Check the Persons and Organizations collection import files for completeness.
-
Organizations: Add the DisplayName values. Confirm that PDXpert contains matching Languages, Partner Classifications, Currencies and Countries collection members.
-
Persons: Confirm that PDXpert contains matching Countries collection members. If some persons will have user accounts in PDXpert, you can create their accounts in this file.
-
-
Review the ItemMaster files:
- The Class column must show Document for each row that should be imported as a document (part rows can have an empty Class value, or use Part).
- Each defined set of values must have a matching PDXpert collection member. For example, the values in Owner, Type, Lifecycle, Trustee, DefaultUOM, MakeBuy, CostCurrencyShort and possibly custom attributes must match members of (respectively) Organizations, Part Types or Document Types, Item Lifecycle Phases, Persons, Units of Measure, Currencies and Custom collections.
-
The export files for BOM, sources, file attachments may have rows with empty relationships. Delete all rows where the child data is empty (hint: probably where the ChildNumber or IsFileIn is empty).
-
The PDX package may include documents (as Items). Depending on the data source, the PDX package may show these documents on bills of materials. PDXpert shows the documents separately, on a References list. A copy of the BOM file can be used as the basis for importing documents into items' References lists. Be sure to delete the rows from the BOM import file, if needed.
-
PDXplorer 4 only: If needed, split the PDX-ListFiles export file into Revision files import and Item files & links import formats. URI links (usually as IsFileIn=No) can be imported into PDXpert's Item Files lists. Rows containing IsFileIn=Yes are usually imported into the items' Revision Files lists.
-
Files exported as a group may include the PDX package identifier, and may need to be renamed. (Search the internet for file renaming tools that can remove extra characters used as PDX internal identifiers.) All file references for importing the physical files must be reviewed for both the correct folder path, as well as the correct file name in the folder.
Importing the CSV files into PDXpert§
Import sequence
Import the files in a sequence that builds on each earlier file:
- Organizations collection
- ItemMaster
- Sources
- Bill of Materials
- References
- File attachments (revision and/or item)
Import instructions
For important information on initializing the PDXpert system, see the PDXpert application help topics How to report, import & export > Import & update items >
- Use the Batch Importer (on line)
- Organizations collection import (on line)
- Persons collection import (on line)
- Item Master import format (on line)
- Sources import (on line)
- Bill of materials import (on line)
- Item files & links import format (on line)
- Revision files import format (on line)
Final comments§
Limits of this procedure
Pre-release only
This application note is not useful for continuous PLM-to-PLM system transfers.
As noted earlier, PDX packages are not well-suited to move data from one PLM system to another. PDX packages often require additional work before they can be imported into PDXpert. In addition, PDXpert's batch data import tool is designed to initialize PDXpert with pending (unreleased) part and document records, and for minor updates to item-level attributes like unit costs and custom attributes. The batch import tool is not capable of importing revised data for released items, or for reproducing revision change histories.
You can, however, export a new BOM revision from a selected item in a PDX package. Import the CSV file into an individual assembly's BOM Markup list using the context menu command.
Number of PDX packages
This application note works well for transferring a small number of large product files that were exported at the same time.
If you have many PDX packages, or the PDX packages were exported at different times, then it's more efficient to extract the XML and file attachments directly from the PDX packages. In addition to extracting and merging the data much faster, scripting allows auto-filling missing data, excluding obsolete items, converting unwanted collection members into preferred names, cleaning part descriptions, and detecting systemic data errors.
While the details are too complex for an application note, this is the general procedure using PDXplorer 5 or later:
-
Open each PDX package and copy the SQLite working database. In a script, you can open a package from the command line:
"C:\Program Files\PDXplorerDB\PDXplorerDB.exe" drive:\path\filename.pdx
PDXplorer 6 adds an automatic close-after-export option. To ensure record identifier uniqueness, your batch process should wait at least 100 milliseconds between opening each PDX file in the batch. Copy the export results before opening the next PDX package.
"C:\Program Files\PDXplorerDB\PDXplorerDB.exe" /close drive:\path\filename.pdx
-
Save all file attachments in a specified folder, and map the path and names to database file attachment records.
-
Identify data elements that require re-mapping, such as item types, custom attributes, units of measure, contacts, etc. Look for PDX …Other attributes (e.g., globalLifeCyclePhaseCodeOther) that may require adding new members to PDXpert collections.
-
Reconcile item revisions to identify the most recent. If desired, redirect older revision file attachments to Item Files lists.
-
Add/modify the SQLite database queries to generate the CSV import templates for PDXpert.
These steps require moderate coding skills (probably SQLite and PowerShell). Contact us if you'd like our assistance.
More information
Before using this application note, review the Import part, document, file data tutorial.
If there's no documentation for the PDX package generator tool, PDXpert's IPC-2570 implementation may be useful.
This application note was relevant to the PDXpert software release that was current at time of publication. Product changes since that time may affect its utility. We'd be happy to assist you in assessing the applicability of this note to your situation.
Working within PDXpert
- Designing an engineering change process and workflow
- Server: Fast file content searches using IFilters
- Server: Scheduled backup for the database and library
- Server: Running several PDXpert Application Servers on the same network
- Batch Import: Preparing file attachments for import
- Batch Import: Converting a PDX package for PDXpert
- Batch Import: Keep settings, remove test item records
- Batch Import: Creating release sets for imported data
- Batch Import: Bulk replacing item attributes
- PDX package: Compare all product data, not just the BOM
- PDX package: IPC-2570 package implementation
- PDX package: IPC-2570 security signing and password extensions
- Adding a custom SQL Server report to PDXpert
- Adding a custom SQL Server report to PDXpert 8.0 to 11.2
- Designing email notice templates
- Including labor time and cost in assemblies
- Materials management for regulatory compliance
- Switching an existing item to a different type
- What's the difference between Item Revision State and Item Lifecycle Phase?
- Copying an assembly BOM to another assembly
- PDXpert permissions: User access design
Working with other software applications
- Using Altium Designer EDA software with the PDXpert client
- Using Altium Designer EDA software with the PDXpert server
- Using Cadence OrCAD Capture CIS with the PDXpert client
- Using Cadence OrCAD Capture CIS with the PDXpert server
- Using Pulsonix EDA software with the PDXpert server
- Importing a CAD bill of materials into PDXpert PLM software
- MRP/ERP data transfer options with PDXpert PLM software
- Exporting PDXpert PLM parts, BOM & sources to MRP/ERP
- Importing Trilogy Design Parts&Vendors data into PDXpert
- Exporting a bill of materials from PDXpert to Visio