PDXpert PLM Software
Application Notes
Creating a graphical bill of materials in Visio
Last update 2014-02-12
If you have a recent PDXpert release, go to Exporting a bill of materials from PDXpert to Visio. Current PDXpert releases can now export a file for use with the Visio Org Chart Wizard, without requiring Excel formulas and find/replace. This application note is only useful for PDXpert 9.2 and earlier.
With PDXpert PLM software, you can create parts in multi-level structures. While most PLM software users will be quite comfortable navigating the multi-level structure within PDXpert, you may occasionally require a graphical means for showing the product. A picture may be useful during a major design review, or as a navigation reference for manufacturing, product service or customer support staff.
Within 10 minutes, you can have a graphical view of your bill of material in Microsoft® Visio®. Although this process relies on Microsoft Office 2007 tools, the techniques should be applicable to other releases.
Download this file, which contains the XSLT and Excel spreadsheet template files that you'll need, as well as some example exports from PDXpert and a Visio and PDF file with the results.
You can export a multi-level BOM from PDXpert PLM software as XML, CSV, Excel, and other useful formats. The native data format must be transformed using XSLT and, in this instance, exported as an Excel spreadsheet.
We'll create a new member of the PDXpert Data transformations collection (see the PDXpert client help guide: Contents > How to use the Collection Explorer > Adding a new collection member). We'll only need to do this once. This lets us use our Data transformations collection member any time we want to create the export file.
For PDXpert releases 8.0 or later:
On the Data Transformations collection node, right-click to Add new member.
Set the Name toMulti-level Export (Current).
Open the MultiLevelExportCurrentXml-7.txt file in Windows Notepad (not in a word processing application). Copy the entire contents (Ctrl+A, Ctrl+C), and paste it (Ctrl+V) into the new member's XML textbox.
Close or lock the window to save your changes.
For PDXpert releases prior to 8.0:
On the Data Transformations collection node, right-click to Add new member.
Set the Name toMulti-level Export (Current).
If the Table-formatted data checkbox is available, mark it as TRUE.
Open the MultiLevelExportCurrentXml-7.txt file in Windows Notepad (not in a word processing application). Copy the entire contents (Ctrl+A, Ctrl+C), and paste it (Ctrl+V) into the new member's Export/Report XSLT textbox.
If your PDXpert release displays the Table-formatted data checkbox, then use the MultiLevelExportCurrentXslt-6.txt file instead.
Close or lock the window to save your changes.
To export pending assembly markups, you'd follow this procedure for creating aMulti-level Export (Markup) DT member using the appropriate MultiLevelExportMarkupXml-7.txt file or MultiLevelExportMarkupXslt-6.txt file.
After we have created the new DT member, we're ready to export the multi-level product tree:
Open the Report/Export Wizard (Tools | Report/Export Wizard...).
In older releases, click theExport table-formatted data button.
- Select the Multi-level Export (Current) dataset, and click the Next button.
- Drag a released multi-level assembly from the Item Explorer onto the Export Wizard, and click theFinish button.
- In the Save As file dialog, enter a file name, selectCSV (comma separated) (*.csv) from the Save as type: dropdown, and click the Save button.
Applying the "Multi-level Export (Markup)" template would export the marked-up version of the assembly.
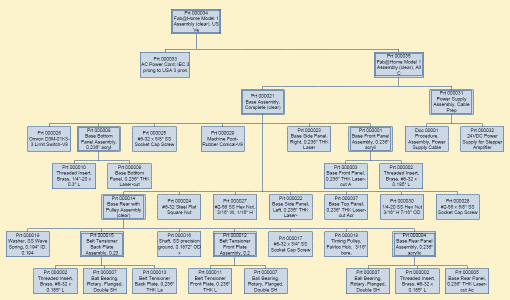
Visio 2007 has a useful utility called the Organization Chart Wizard. It will import a list of relationships and automatically create a hierarchical organization tree, which looks pretty similar to what we'd want for our product tree.
Unfortunately, the Wizard assumes that an employee can have only one manager, and automatically filters any duplicate employee records. However, we want to show that a particular part reports to multiple parent items. So, we have to trick the Organization Chart Wizard by temporarily modifying the imported data. After the data has been imported into Visio, we'll remove these changes. The Excel formulas to achieve this are a bit complicated, but it's mostly a copy-and-paste operation from our PDXpert-bill-of-materials-tree-for-visio.xls spreadsheet template.
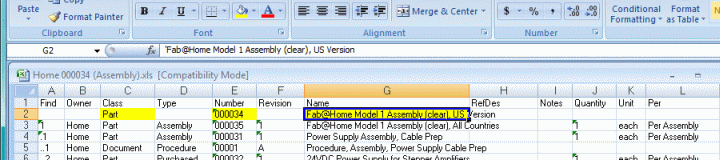
In Excel, open both the PDXpert structure export file (created above) and the downloaded template file, and then:
- Insert a new row 2, and identify the export file top assembly. You only need to enter the values forClass ,Number andName . If yourNumber value is purely numeric (e.g.,000034 ), you can force it to be treated as a text string rather than a number (34) by prefixing it with an apostrophe ('000034 ).
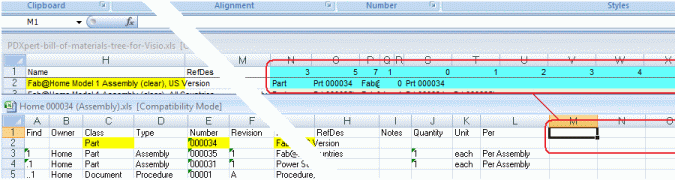
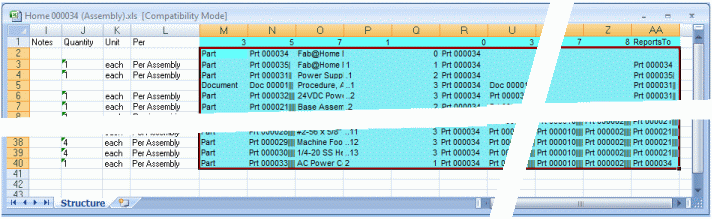
- Highlight and then copy all 15 columns of the top 2 rows (rangeN1:AB2 ) of formulas from the Excel template into the first empty cell to the right of your structure export data (M1 or N1). Some cells may appear blank, but they'll be useful in the next step.
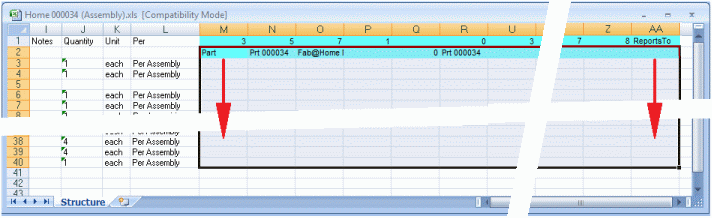
Replicate the formulas in row 2 for all the items in your structure export spreadsheet. Highlight the 15 cells in the second row, and then increase the selection to include all empty cells for the other items. Replicate the formulas by selecting the Fill Down command (Ctrl+D). Note that a unique number of "|" characters has been added to each row, which will prevent the Visio from filtering duplicates. We'll get rid of these later.
Click on the "new" tab next to the Structure tab to create a new worksheet in your export workbook calledChart. Paste the following values into the appropriate cells of the Chart worksheet (the results of C2 will appear blank, since the top assembly reports to nothing):
Cell Value A1 Name A2 =INDIRECT(ADDRESS(ROW(),MATCH("ReportsTo",Structure!A$1:Structure!AZ$1,0)-13,4,,"Structure")) B1 Title B2 =INDIRECT(ADDRESS(ROW(),MATCH("ReportsTo",Structure!A$1:Structure!AZ$1,0)-12,4,,"Structure")) C1 ReportsTo C2 =INDIRECT(ADDRESS(ROW(),MATCH("ReportsTo",Structure!A$1:Structure!AZ$1,0),4,,"Structure")) 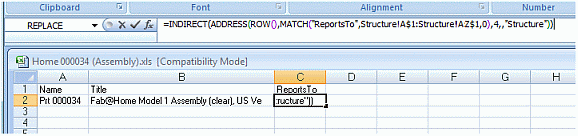
Replicate the formulas in row 2 for all the items in your structure export spreadsheet. Highlight the 3 cells in the second row, and then increase the selection to include all empty cells for the other items. The highlighted rows should match the number of data rows you have in theStructure worksheet. Replicate the formulas by selecting theFill Down command (Ctrl+D).
Save and close the structure export file. We're now ready to import the file into Visio.
Open Microsoft Visio and then:
- On the File menu, selectNew, select Business, and selectOrganization Chart Wizard.
- On the Wizard, select Information that's already stored in a file or database.
- Click the Next button, and follow the remaining steps of the wizard. You can initially accept most of the defaults provided by the Wizard.
- After the structure is displayed, remove all of the "|" characters using theReplace dialog (Edit menu |Replace... ).
- In the Find what: box, enter||||. In the Replace with: box, enter |. Continue replacing until no more changes are possible.
- Repeat the replacement of || with| until no more changes are possible.
- You should now only have single non-repeating instances of|. Replace all | with a single space character (" "). Visio can't accept a zero-length blank in the Replace with: box.
You can use the built-in Visio tools to arrange the objects, and can apply themes and other formatting as desired.
To ensure that the item descriptions fit within the Visio boxes, cell P2 in the template has a formula which restricts the description length to 40 characters. Change the value in this formula (and in the subsequent rows) to adjust the description maximum length.
If you have more than 8 levels in your bill of materials, insert additional columns immediately to the left of the structure tab's ReportsTo column, and update the formulas accordingly. However, given display & printing size constraints, it's more likely that you'll want to delete items from the list; do this on the Structure worksheet prior to copying the formulas from the template.
If your item descriptions use the "|" character, you can substitute "{" or "~" or another unused character in the REPT() function, contained in cell O2 in the template.
This application note was relevant to the PDXpert software release that was current at time of publication. Product changes since that time may affect its utility. We'd be happy to assist you in assessing the applicability of this note to your situation.