PDXpert PLM Software
Application Notes
Using Altium Designer EDA software with the PDXpert client
Last update 2022-03-04
PDXpert provides a centralized repository of your part and document data, including management of approved supplier sources, bills of materials, revisions, and engineering changes. A "live view" of your part and supplier data is available from the PDXpert database via an ODBC connection. When the PDXpert client is open, this local database is refreshed every 10 minutes.
This note outlines how to install the optional SQL Server LocalDB to support Altium Designer's connection to the PDXpert parts list.
The PDXpert database includes a set of read-only views that contain part, supplier and file records. You can use these views, via an Open Database Connectivity ("ODBC") connection, to extract part data for Altium Designer or other ODBC-compliant applications.
Product data is contained in the server machine's Microsoft SQL Server database, and a subset can be enabled on the client workstation. Client-side views are designed for fast and secure CAD part lookup.
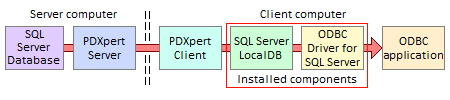
Advantages of using Microsoft SQL Server LocalDB on the client workstation:
- Data obtained from local views has no network delay.
- Even when the workstation is disconnected, the local database can still accept part data queries.
- Data transfers from the server can be encrypted by the PDXpert client connection.
- ODBC connections are constrained to the local workstation, and don't require server information or log-in credentials.
- The principal SQL Server instance can be completely firewalled from the network while still providing ODBC data to remote clients.
To connect Altium directly to the back-end Microsoft SQL Server database, which offers different advantages, see theAltium server-side application note.
Applies to PDXpert PLM software release 9.3.27875.554 or later, on Windows 7 or later. For earlier PDXpert releases and for Windows XP, see the Altium server-side application note.
An application administrator must configure the PDXpert system for use by Altium users.
- PDXpert administrator procedure
- Installing the LocalDB database and tools
- Defining part types & custom attributes for Altium Designer
- Creating and using the PDXpert part types
- Designing and saving the user-defined LocalDB views
- Final notes
After the PDXpert system has been configured, Altium users install the SQL Server LocalDB, enable a user preference within PDXpert, and connect Altium to the LocalDB.
The basic steps for linking Altium Designer to the PDXpert client-side database:
Download and install the appropriate 32-bit or 64-bit Windows version of Microsoft SQL Server LocalDB and SQL Native Client. (This replaces the normal PDXpert client-side SQLite database.) For developing database views, download and install SQL Server Management Studio.
Design your PDXpert part types. Decide whether you'll have a common part type for all components, or a unique part type for each Altium library. After you know the part type(s) you'll need, create the custom attributes (such as schematic symbol name and path) required for your Altium parts.
Import your parts based on the part type and custom attributes. If you don't have any parts to import, create a few test parts or import the example parts in theBatch Importer tutorial.
Create one or more database views for Altium libraries, and save these in the PDXpert Views collection.
Using the SQL Native Client, connect Altium Designer to the PDXpert client-side LocalDB database.
For most ODBC applications, PDXpert uses a SQLite database for caching part data on the client PC. However, Altium Designer connects to the SQLite database using an exclusive file lock, which blocks PDXpert's updates to the SQLite database. If you're willing to accept that Altium blocks PDXpert's updates, you can skip installing SQL Server LocalDB. Whenever you want the current parts data, exit Altium and then run the PDXpert client.
However, it's more likely you'll want PDXpert to refresh your parts list database while Altium is open. In this case, install the multi-session Microsoft SQL Server LocalDB as the ODBC parts cache. Altium connects to LocalDB using the SQL Server Native Client for Windows.
You can also install the SQL Server Management Studio ("SSMS"). SSMS provides access to a CAD-related subset of PDXpert's public views, and is used to develop user-defined views. A PDXpert administrator saves the user-defined views into one or more Views collection members.
Return here afterInstalling Microsoft LocalDB for PDXpert client-side ODBC applications.
Before connecting Altium Designer to the PDXpert database, identify the data that Altium Designer needs. PDXpert has useful built-in properties: part number, description, approved sources and datasheet files. Other data required by Altium, such as component schematic symbols and layout footprints, will need to be added to PDXpert using custom attributes defined on a PDXpert part type.
You must first consider the complete set of attributes that Altium requires, and how you want the part data grouped and filtered in Altium. You then look at your existing PDXpert part types to decide whether to modify existing part types, or create new part types specifically for Altium (or both).
Each time the PDXpert client starts, the client-side views are updated from the server. Minimizing the number of part type views, and custom attributes within each view, reduces the time required for the client to start.
A new part type can be used only by a new part. Existing parts can't be re-assigned to a new part type. Obviously, you have the most flexibility when you first configure and import your parts, and much less flexibility after your system has been used for a while.
If Altium-related parts already exist in your PDXpert database, then you must add custom attributes to their current part type. For example, if electronic components are based on the Purchase part type, then Altium custom attributes must be created on the Purchase part type.
You can choose to use one shared part type for all part categories, or create a distinct part type for each part category.
If you want a set of attributes that is shared across all items, then create all attributes within a single PDXpertPart Types collection member. You could use the default system's Purchase type (if you already have active parts in your database), or perhaps create an Altium-specific Component.
Custom attributes are required for the part category, as well as the name and path of the schematic symbol and PCB footprint.
A complete part name is usually sufficient for searches within Altium. However, users may prefer a small list of parameters for part look-up. These attributes should be named rather generically: perhaps Value (for resistance, capacitance, inductance, IC common name, etc.), Package,Tolerance, Rating (voltage, current, power, etc.).
Create a PDXpert custom collection that contains part categories that reflect your Altium libraries. These collection members are assigned to the part type's Category custom attribute. The Category is the selector for grouping your parts, or creating separate Altium libraries.
This is a very simple system to maintain, and complements a non-significant part numbering system. It works best with precise and descriptive part names.
This application note describes the common part type/shared custom attributes option.
You can create a series of part types (Resistor,Capacitor, etc.). Each part type is the container for a unique set of standard and custom attributes. All part types share common attribute names (like Value, Library Ref, Footprint Ref), but each type also has a unique part name template and custom attributes (WVDC, Tolerance, Tempco, Gate Count, Forward Drop, Package, etc.). You'll typically create an Altium library for each part type.
For simplicity, using between 8 and 15 electronic part categories works well. Creating too many distinct part types can complicate managing shared custom attributes across all types (for, say, export to ERP/MRP), and maintaining individual views for each library may get rather tedious.
If you're using category-based part number prefixes, then many of the part types may already be defined.
This option is discussed in more detail in theAltium server application note.
Read the PDXpert help topic Contents >Collections reference > Custom attributes to learn about naming and managing custom attributes.
Your PDXpert custom attribute names don't have to match Altium's names. A custom attribute's name can be transformed in the SQL query to conform to Altium's requirements.
Parts in the PDXpert database have many standard attributes like owner, type, number, description, unit of measure, and cost; these should not be duplicated in the custom attributes.
Each PDXpert part may include an approved set of supplier parts on theSources list. Don't create custom attributes — such as manufacturer name, part number and datasheet URL — that duplicate the data on theSources list. We'll link to this data in our queries.
In this example, we'll adopt a simple approach:
Create a custom collection of Altium part categories.
Create a new CAD-related Component part type, and apply a minimal set of custom attributes (schematic symbol, PCB footprint, part category). Within Altium, parts are grouped using the part category, and searched using the part name — which we'll assume contains the part's value, tolerance, power, etc.
Although the Component part type will usually represent purchased parts with approved sources, it may include custom in-house items (e.g., custom-wound chokes).
- Use the default Source part type to identify an approved supplier part, and point to the supplier's datasheet using the part'sItem File external link. This URL will be displayed as Altium'sComponentLink data.
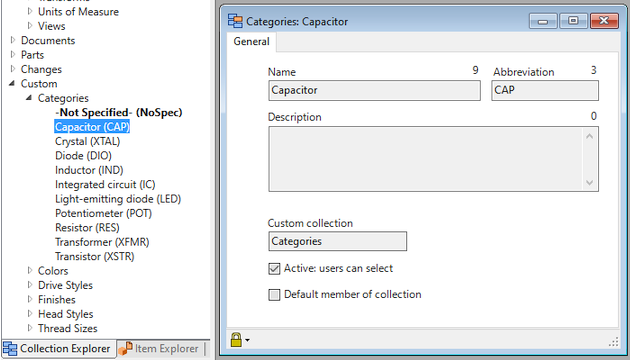
In the Collection Explorer, create the Categories custom collection to organize your part searches within Altium. Add new members to reflect your preferred set of Altium libraries. It's good practice to include aNot specified member to be the default value for newly-created parts.
The collection might look something like this (the default member is in bold):
In the Collection Explorer, create a new Component member of the Part Types collection.
- On the General tab, mark theShow Sources tab checkbox.
- On the Attributes tab, set theDefault make/buy toMake and Default lifecycle phase toProduction. Set other values as needed, such as identifier sequence, revision formats and part name template.
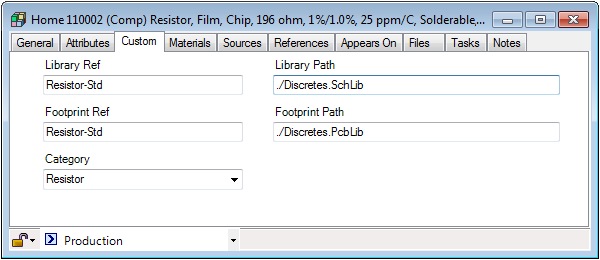
- On the Custom tab, create the library, footprint and category custom attributes as shown below. If you have a standard path, you can enter it as the default Value; otherwise leave the default empty. In the Category value, select the Value as Not specified.
| Custom attribute | Sort | Scheme | Name | Description or purpose | Value |
|---|---|---|---|---|---|
| Library Ref | 1 | Data: String | Library Ref | Schematic symbol name | (none) |
| Library Path | 2 | Data: String | Library Path | Relative path to schematic symbol | (none)1 |
| Footprint Ref | 3 | Data: String | Footprint Ref | PCB footprint name | (none) |
| Footprint Path | 4 | Data: String | Footprint Path | Relative path to PCB footprint | (none)1 |
| Category | 5 | Custom: Categories | Category | Component category | Not specified |
1. If the path is consistent for all CAD users, you could enter the path as the default Value.
Now that you have a Component part type, use the New tab on the Item Explorer to create new parts with their sources. For example, a 196 ohm resistor based on the Component part type might have custom attributes like:
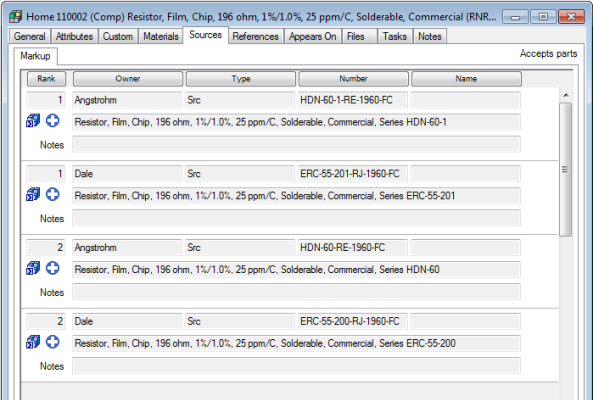
The example part may also identify approved supplier parts on the component part's Sources list. Each of these source parts may have an external web link to their datasheets.
For more information about PDXpert's ODBC views, refer toContents > How to report, import & export >View & export via ODBC in the PDXpert help guide.
The PDXpert databasepublic views (with a ...View suffix) anduser-defined views (with a My... prefix) are used for ODBC queries. Custom attributes appear as columns within the views, alongside the standard columns like Owner, Number, Type and Description.
Public views in the PDXpert database provide a comprehensive set of data columns. For CAD applications, you'll only need columns that are related to part identification, CAD application support, and supplier data. User-defined views select only the necessary columns, and hide unwanted columns.
Open the SQL Server Management Studio application, and connect to the(localdb)\\MsSqlLocalDb using Windows Authentication.
Right-click the PDXpertLocalDb node and selectNew Query from the context menu.
This query selects the parts, custom attributes and sources with external datasheet URLs:
SELECT -- Note 1
CAST([Number] AS nvarchar(250)) AS [Number]
,CAST([Description] AS nvarchar(250)) AS [Name] -- Note 2
,CAST([Category_Member] AS nvarchar(250)) AS [Category]
,CAST([Library Path] AS nvarchar(250)) AS [Library Path]
,CAST([Library Ref] AS nvarchar(250)) AS [Library Ref]
,CAST([Footprint Path] AS nvarchar(250)) AS [Footprint Path]
,CAST([Footprint Ref] AS nvarchar(250)) AS [Footprint Ref]
,CAST([Owner_1] AS nvarchar(250)) AS [Manufacturer]
,CAST([Number_1] AS nvarchar(250)) AS [Manufacturer P/N]
,CAST([Datasheet_1] AS nvarchar(250)) AS [ComponentLink1Description]
,CAST([Url1].[Filename] AS nvarchar(250)) AS [ComponentLink1URL] -- Note 3
,CAST([Owner_2] AS nvarchar(250)) AS [Manufacturer2]
,CAST([Number_2] AS nvarchar(250)) AS [Manufacturer2 P/N]
,CAST([Datasheet_2] AS nvarchar(250)) AS [ComponentLink2Description]
,CAST([Url2].[Filename] AS nvarchar(250)) AS [ComponentLink2URL]
FROM [SourceItemMasterView] -- Note 4
LEFT JOIN (
SELECT [FileName],[ItemId],'Data:' + [OwnerShort] AS [Datasheet_1]
FROM [FilePairMasterView]
WHERE [FileName] LIKE '%://%'
) Url1 ON [ItemId_1] = [Url1].[ItemId]
LEFT JOIN (
SELECT [FileName],[ItemId],'Data:' + [OwnerShort] AS [Datasheet_2]
FROM [FilePairMasterView]
WHERE [FileName] LIKE '%://%'
) Url2 ON [ItemId_2] = [Url2].[ItemId]
WHERE [Type] = 'Component'
Notes:
- Do not use SELECT * in your query. Always specify the exact columns required.
- The standard and custom attribute names in PDXpert can be replaced to conform to Altium's requirements using SQL's syntax [PDXpert column] AS [Altium label].
The CAST() safely limits the length of the data, but may truncate long URLs.
For simplicity, develop your query on the client database. If you develop a query on the server database using a view within the viewer scheme, remove the explicit reference to viewer before saving the query in theViews collection. Views within the server'sviewer scheme appear with the client's dbo scheme. If you need to extract similar data from both client and server, create a separate view tailored for each.
SQL Server Management Studio lets you develop a view withORDER BY, but it won't run when saved unless theTOP clause is also included. Since Altium can sort the data, it's best to avoid using an ORDER BY clause in your views.
Altium will treat each view in the LocalDB database as a library table.
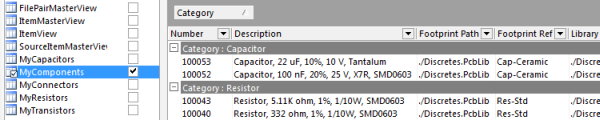
- You can have a single library table, and group parts within Altium using the Category column header. Save the LocalDB query as a member of the PDXpert Views collection (as, say,MyComponents).
You can have a separate library table for each category. Modify the query by changing the SQLWHERE clause:
...
WHERE [Type] = 'Component' AND CAST([Category_Member] AS nvarchar(50)) = 'Resistor'
Create a PDXpertViews member (e.g., a MyResistors view) for each modified query. After you've constructed the first view, the views for other Altium libraries, such asMyCapacitors for the capacitors library, are quite similar.
To add your SQL code to PDXpert,add a new member to the Views collection.
At this point, your design is complete. If you wish to test your design with Altium, continue with the Altium user setup, below. Of course, if you've already installed SQL Server LocalDB, then you should skip the step.
If you make changes within the PDXpert collections, your queries will need to be reviewed and possibly revised. For instance, the example SQL statement will fail if you remove or rename a custom attribute, or rename the Component part type. Make changes to your PDXpert collections cautiously to minimize reworking your user-defined views.
Your SQL queries must only extract data using SELECT statements. Never attempt to update or delete data within the PDXpert database.
Any changes to the views presented to Altium, such as adding or removing columns or changing column labels, will require updating users' Altium database library (.DbLib) file.
The basic steps for linking Altium Designer to the PDXpert client-side database:
Download and install Microsoft SQL Server LocalDB and ODBC support.
Enable the SQL Server LocalDB views in the PDXpert client application.
Connect Altium Designer to the PDXpert client-side LocalDB database: See next section.
Close Altium while making changes to PDXpert views or custom attributes. Changes to the PDXpert database may require updating the Altium database library (.DbLib) file.
To connect Altium Designer to SQL Server using ODBC, refer to Altium's help (for example,Using Components Directly from Your Company Database) or contact Altium for technical support. The following ideas are provided as a useful starting point.
You'll still be using schematic (.SchLib) and PCB footprint (.PcbLib) libraries, but these will no longer contain detailed source information like part number, description, vendors and datasheet links. Instead, your Altium libraries simply contain the CAD information required for creating schematics and PCB layouts. The PDXpert database manages part information that's shared with other groups like purchasing and manufacturing.
You can now connect Altium Designer to the ODBC data source (PDXpertLocalDB) using a Database Library file.
For example, to connect to the PDXpert LocalDB database, select the Use Connection String option:
Select File | New | Library Database Library.
Select Source of Connection as Use Connection String.
Click Build to open the Data Link Properties window.
On the Provider tab, select the most recent version shown of ODBC Driver XX for SQL Server (preferred) or SQL Server Native Client 11.0 (if needed), and clickNext >>.

On the Connection tab:
1. Select or enter a server name: (localdb)\\MsSqlLocalDb 2. Enter information to log on to the server: Use Windows NT Integrated security (SPN is empty) 3. Select the database: PDXpertLocalDb Click the Test Connection button to verify your settings.
After the connection has been established, specify the appropriate matching criteria as described in the Altium Designer help topic.
The data sources — schematic symbols, PCB footprints and part database — are dynamically merged into a new Altium integrated project:
- On the File menu, selectNew | Project, and create an Integrated Library (.LibPkg) file.
- Add all of your schematic (.SchLib) and PCB footprint (.PcbLib) libraries to the integrated library project.
- Add the new Altium database library (.DbLib) file.
Altium and Altium Designer are trademarks or registered trademarks of Altium Limited or its subsidiaries.
This application note was relevant to the PDXpert software release that was current at time of publication. Product changes since that time may affect its utility. We'd be happy to assist you in assessing the applicability of this note to your situation.